
The main window
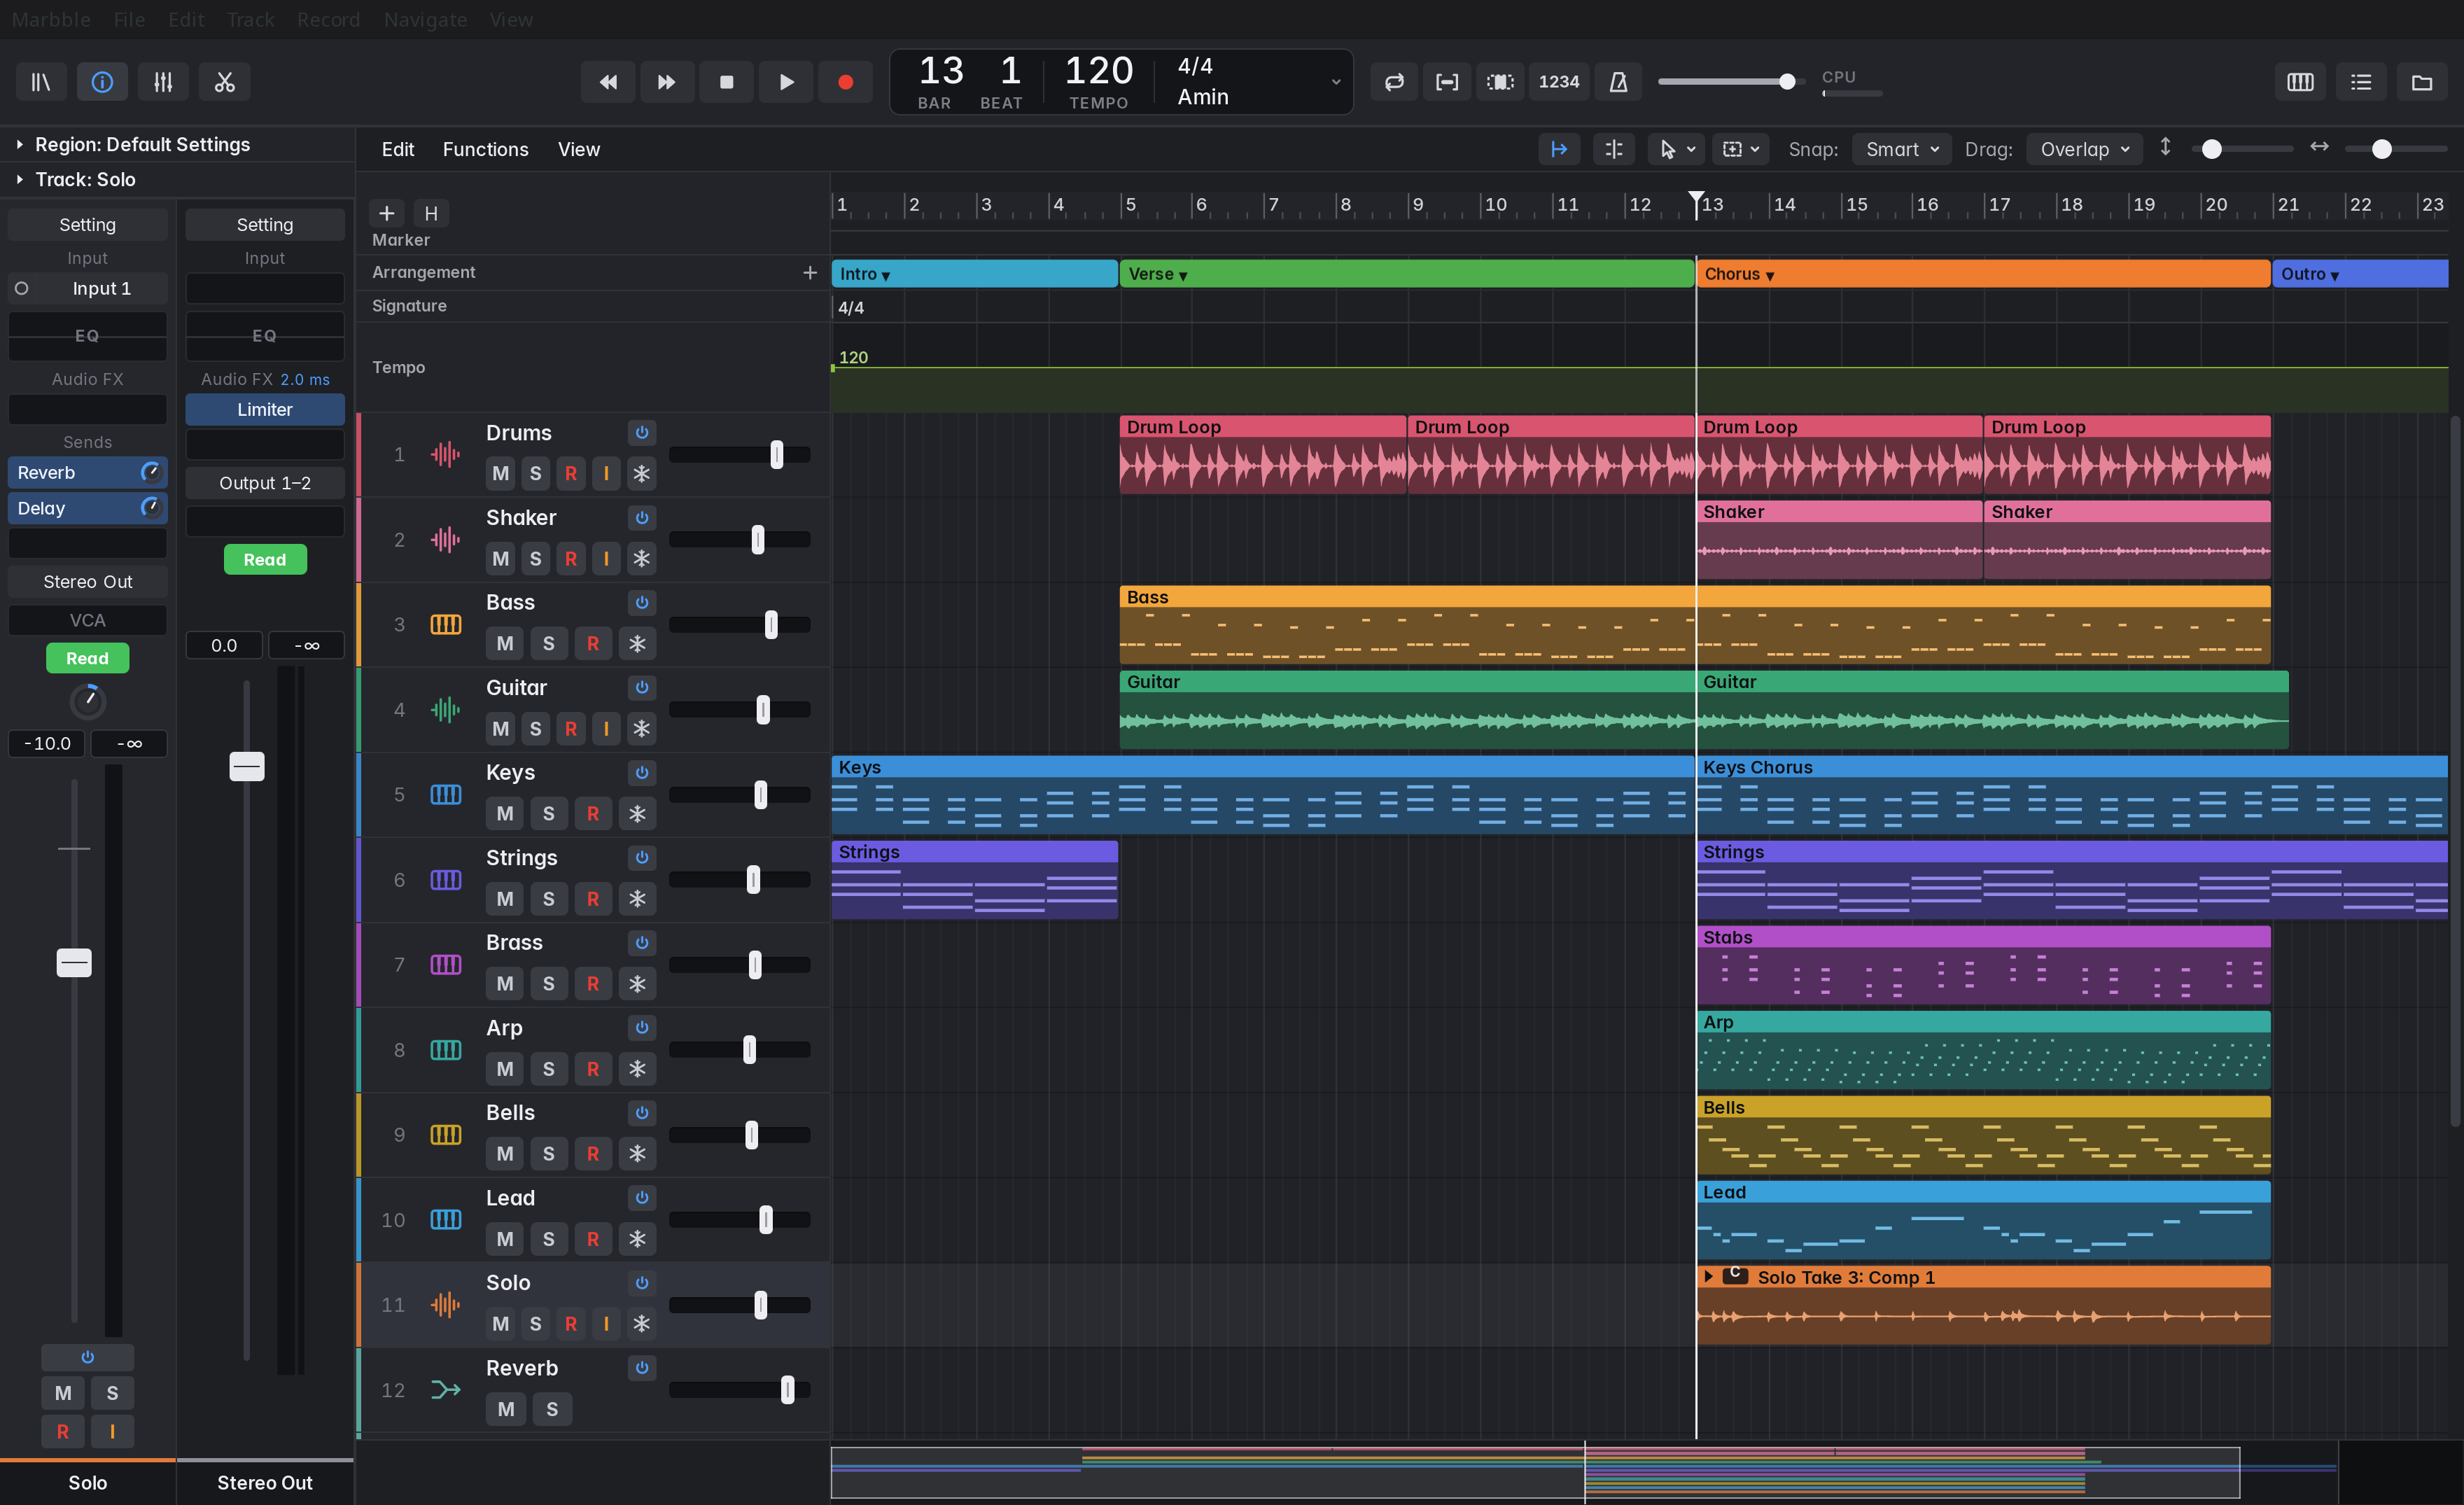
The window is laid out like Logic Pro 11:
| Area | Where | Show or hide |
|---|---|---|
| Control bar | top | always |
| Library | far left | Y |
| Inspector | left of the track headers | I |
| Tracks area | centre | always |
| Mixer, Editors, Event List or Step Sequencer | bottom (one at a time) | X (Mixer), E or P (Editors), D (List Editors); the Step Sequencer from its tab or a pattern region |
| Browser (All Files) | right | F |
| Status line | bottom edge | always |
Drag the dividers between panes to resize them; double-click a divider to reset it. Pane sizes are remembered. The bottom section never takes the whole window: the Tracks area keeps its menu bar, ruler, global tracks, overview and a little of the track list, so the divider above the section stays in reach. A section remembered taller than the window allows (after the window was made smaller, say) shows at the height there is room for.
Control bar
Section titled “Control bar”From left to right:
- Library, Inspector, Mixer, Editors buttons.
- Transport: Rewind (
,, to the previous bar line), Forward (., to the next bar line), Stop, Play (Space), Record (R). Stop while stopped returns to the left locator when Cycle is on, otherwise to the start, and the Tracks area and the open editor scroll sideways to show it if it’s off screen. Other jumps (Go to Beginning, Rewind, Forward, markers) leave the view where it is; Scroll to Playhead (the button beside Catch, or Alt+`) brings the playhead into view. - The LCD:
- BAR / BEAT: the playhead position. Drag vertically to move the playhead by bars.
- TEMPO: drag vertically to change it, or double-click to type a value (Enter applies, Esc cancels).
- Time signature: click for 2/4, 3/4, 4/4, 5/4, 6/8, 7/8, 9/8 and 12/8.
- Key: click for the major and minor keys.
- The chevron offers “Beats & Project”, “Time” (the position as time) and “Project Settings…”.
- Mode buttons: Cycle (C), Autopunch, Replace (red when on: recordings replace what they overlap; see Overlapping recordings), Count-in (Shift+K), Metronome (K).
- Master volume slider and the CPU meter with the load as a percentage. See the CPU meter.
- Musical Typing (Ctrl+K), List Editors (D, the Event List) and Browsers (F) buttons.
Tracks area
Section titled “Tracks area”-
Local menu bar: Edit, Functions and View menus; on the right, the Catch button (`, on by default: the view follows the playhead), Scroll to Playhead (shows the playhead without moving it), the Left-click Tool and Ctrl-click Tool pop-ups (see Tools and the marquee), the Snap pop-up (Smart, Bar, Beat, Division, Ticks, Off; Smart follows the zoom), the Drag pop-up (see Drag modes), the Height slider (track height) and the Zoom slider (horizontal zoom).
-
Ruler, from the top:
- the cycle strip (yellow): drag to make a cycle range, drag it or its edges to move or resize it, click it to switch Cycle on and off;
- the bar numbers: click or drag to move the playhead;
- the Autopunch strip (red): works like the cycle strip, for the punch range;
- the marker lane (see Markers).
Right-click the cycle strip, the bar numbers or the Autopunch strip for Move Playhead Here and Create Marker Here (at the click, snapped to beats at least), Cycle (C), Autopunch, Set Locators by Regions (U) and Snap (Smart, Bar, Beat, Division, Ticks, Off). The marker lane has its own menu.
-
Track headers: colour, number, icon, name with the power button (On/Off, grey while the track plays) at its end, the M (Mute), S (Solo), R (Record Enable, audio and instrument tracks), I (Input Monitoring, audio tracks) buttons, the Freeze (snowflake) button, a group badge, and a volume slider whose groove is the track’s level meter. Short tracks put it all on one line (see below). The + button above the headers opens New Tracks; the H button turns on hide mode. Under them, level with the ruler’s marker lane, is the Marker row. A muted track’s regions are drawn grey, as a muted region is; a track that is off is dimmed.
-
Tracks: regions on lanes. Scroll with the wheel (Shift+wheel or a sideways trackpad swipe scrolls through time); Ctrl+wheel zooms horizontally around the pointer, Alt+wheel changes track heights. With a mouse that has only a vertical wheel, set Settings › Editing › Mouse Wheel Scrolls to Horizontally (time): the wheel then scrolls through time and Shift+wheel scrolls the tracks. Over the track headers the wheel always scrolls the tracks, and over the ruler and global tracks it always scrolls through time. A click without a drag on empty space in a lane also moves the playhead there (snapped to the grid); clicking a region only selects it. Settings › Editing › Click Moves Playhead sets this: Anywhere in the tracks (regions too), Empty space only (the default) or Never. Before 0.1.0-alpha.7 the default was Anywhere; an install that has settings from then keeps that unless you change it.
-
Overview: the strip along the bottom, in place of a horizontal scroll bar, shows the whole project in miniature: a row per track (a closed stack is one row), each region as a bar in its colour, the cycle range and markers along the top edge, the playhead, and the end of the last region, with the timeline after it shaded darker. The lit box is the part shown in the Tracks area, both the time and the tracks scrolled into view.
- Drag the box to scroll, across and up or down.
- Click outside the box to centre the view there; keep the button down to go on dragging.
- Drag the box’s left or right edge to zoom: the view shows the time between the edges (within the usual zoom limits).
- The wheel scrolls through time (Shift+wheel scrolls the tracks); Ctrl+wheel zooms around the pointer when it’s over the box, otherwise around the middle of the view.
- View › Show Overview (in the main menu bar or the Tracks area’s View menu), or right-click the strip, hides it and brings back the scroll bar; the same menu item, or a right-click on the scroll bar, shows it again. The choice is remembered.
Track headers:
- Select a track by clicking its header; Ctrl+click adds or removes a track; Shift+click selects a range. Up and Down select the track above or below, scrolling it into view.
- Rename by double-clicking the name.
- Reorder by dragging the track number or icon (just the number on the shortest tracks, which have no icon). A track dropped among a stack’s subtracks (or right under an open stack’s header) goes into that stack.
- Resize by dragging the header’s bottom edge. Alt-drag resizes every track, and double-clicking the edge resets the track. Ctrl+Down and Ctrl+Up (or Alt+wheel, or View › Taller / Shorter Tracks, or View › Track Height: Mini, Compact, Small, Medium, Large, Extra Large) change all tracks. Tracks go from 22 to 260 px; heights are remembered per project.
- Short tracks: from 52 px up the name sits above the buttons. Below that the header is a single line with a smaller icon (32 to 51 px), or without the icon and in a smaller size (below 32 px). The M, S, R, I and Freeze buttons then move into the ⋯ menu, which lists them with check marks (and their keys), plus the lane’s parameter while automation is shown. A switch that is on stays in the header, so a muted, soloed, armed, monitored or frozen track still shows it; click it to turn it off.
- With Show Automation on (A), headers 76 px or taller add a line with the automation mode, the lane’s parameter and a + for another lane. On shorter headers these take the volume slider’s place (the mode and + above the parameter), so M, S, R and I stay where they are; the lane itself, the Inspector’s strip and the Mixer still set the volume.
- Button columns: each button has its column, the same on every header, with a gap where a track has no such button (an instrument track has no I, an aux no R, I or Freeze). On one-line headers the columns are those of the switches that are on somewhere, so one track’s M lines up with another’s. Regions on short tracks get a slimmer name bar over a thin strip of waveform or notes.
- Volume: drag the slider (Shift for fine), double-click or Alt-click it for 0 dB; its tooltip shows the level. In a group with volume linked, the other members follow. The meter inside the groove is post-fader and uses the slider’s own scale, so a full-scale signal reaches the thumb, and only a hotter one passes it; peaks are held for 2 s, in red above 0 dBFS. Its right end lights red while the track’s clip indicator is on (see The channel strip). A folder stack’s slider has no meter (it moves every subtrack).
Inspector
Section titled “Inspector”The Inspector shows a Region section (mute, position, length, loop, the playback parameters described under Region playback parameters, and for audio regions gain and the fade rows described under Fades and crossfades) and a Track section, both collapsed by default, followed by the selected track’s channel strip and the Stereo Out strip.
- Length is in bars, beats, divisions and ticks counted from zero, like the Event List, the Audio Track editor and the help tags while dragging (4 0 0 0 is four bars), with the time in minutes and seconds after it. Position is in bars and beats counted from one, as on the LCD.
- The Track section has the track’s Name (type a new one and press Return; Esc puts the old one back), Color (click the swatch for the colour grid), type, Input (audio tracks: a pop-up, as on the channel strip) or instrument, Output (a pop-up: Stereo Out, the stack, or an aux), Freeze (as the snowflake button), the region or subtrack count and the group. Choosing a track (clicking its header or its strip in the Mixer, right-clicking its empty lane, or Up and Down) deselects the regions on other tracks, so the Region section never describes a region on a different track from the Track section.
Library and Browser
Section titled “Library and Browser”- Library (Y): the plug-ins for the selected track. For an instrument track it lists instruments (the built-in ones by group, then plug-ins by vendor) and loads into the instrument slot; for other tracks it lists Audio FX and loads into the first free insert slot. Search with the field at the top; Rescan rescans plug-ins.
- Browser (F), “All Files”: browse folders (double-click to open, the up button for the enclosing folder). Drag audio files into the tracks area, or double-click one to import it at the playhead on the selected audio track.
Status line
Section titled “Status line”The project name (“Edited” when there are unsaved changes), the plug-in delay compensation status, the audio devices, and the number of MIDI inputs.
The menu bar
Section titled “The menu bar”| Menu | Items |
|---|---|
| Marbble | About Marbble (shows the version), Settings…, Appearance…, Key Commands…, Control Surfaces › (Learn Assignment for Last Touched Parameter, Controller Assignments…), Quit Marbble (Ctrl+Q) |
| File | New…, Open Recent…, Open…, Save, Save As…, Save as Template…, Revert to Saved, Revert to ›, Project Alternatives ›, Project Settings…, Import Audio File…, Bounce Project or Section…, Export Selected Tracks as Audio Files…, Export All Tracks as Audio Files…, Import MIDI File…, Export Selection as MIDI File… |
| Edit | Undo, Redo, Cut, Copy, Paste, Paste at Original Position, Paste Replace, Duplicate, Repeat › (Once to 16 Times), Split Regions at Playhead, Join Regions, Join Regions per Track, Loop Regions, Convert Loops to Real Copies, Pack Take Folder, Set Locators by Regions, Strip Silence…, Section Between Locators ›, Trim ›, Move ›, Name and Color ›, Snap Edits to Zero Crossings, Select All, Select ›, Delete (see Arranging commands) |
| Track | New Tracks…, New Aux, Duplicate Track, New Track with Same Settings, New Pattern Region, Bounce in Place…, Freeze Track, Unfreeze Track, Track On, Create Folder Stack, Create Summing Stack, Group Selected Tracks, Show Output Track, Hide Track, Unhide All Tracks, Delete Track, Delete Unused Tracks, Track Alternatives › |
| Record | Play / Stop, Record, Cycle, Autopunch, Metronome, Count-in, Low Latency Mode |
| Navigate | Create Marker, Delete Marker, Go to Previous Marker, Go to Next Marker, Open Marker List |
| View | Library, Inspector, Mixer, Editors, List Editors, Browsers, Show Automation, Show Used Automation, Show Global Tracks, Show Overview, Musical Typing, Step Input Keyboard, Show Hidden Tracks, Zoom In, Zoom Out, Larger Interface, Smaller Interface, Actual Size, Theme › |
| Window | Minimize, Mixer in Separate Window, Editor in Separate Window, Event List in Separate Window, then the open windows (the main window and each separate window): choose one to bring it to the front |
| Help | Marbble User Guide, Key Commands…, What’s New in Marbble, Check for Updates…, Report an Issue…, Marbble Website. Key Commands opens Settings › Key Commands; Check for Updates… asks GitHub whether a newer version is out on your update channel and says what it found; the others open this guide, the changelog, a new issue on GitHub and the website in your browser |
Each item shows its key beside it: the fixed keys below, and the key commands’ keys as set in Settings › Key Commands (R for Record, X for the Mixer…), which change in the menu when you reassign them. Settings and modes that are on are ticked (View’s panes, Record’s Cycle, Autopunch, Metronome, Count-in and Low Latency Mode, Snap Edits to Zero Crossings, Track On, the theme), and items that don’t apply are greyed out, as in the Tracks area’s menus: Cut, Copy, Join or Delete with no regions selected, Paste with nothing copied, Unfreeze Track with no frozen track selected. A submenu whose items all don’t apply is greyed out too (Repeat, Move, Name and Color with no regions selected). One-of-several choices (View › Theme, File › Project Alternatives) show a round radio mark on Linux. The Edit menu is the Tracks area’s Edit menu, item for item, and both use the same names; a region’s right-click menu drops “Regions” from them (Split at Playhead, Join, Loop, Set Locators). Quit Marbble (Ctrl+Q) closes the main window as its close button does, so it asks first when the project has unsaved changes.
The Edit menu acts on what has focus. In the Piano Roll, Cut, Copy, Paste, Duplicate, Delete and Select All act on notes, and Edit › Select’s All Following, Inside Locators, Muted, Same Colored, Equal and Invert Selection (and their keys) select notes, as in Logic; in the Event List they select events (see Edit menu). In the Audio Track Editor with a range selected, Cut, Copy, Delete and Split act on the range. While a bounce is rendering, menu commands are ignored.
Sheets and key commands. While a sheet is open (Strip Silence, Group Settings, a name or value to type, Settings, Bounce…), key commands don’t reach the tracks or editors behind it, even after you click one of its sliders or buttons: Esc closes it and Return presses its default (highlighted) button. Controller Assignments is the exception, as Logic’s window is: Learn Assignment (Ctrl+L), Controller Assignments (Shift+Ctrl+L) and the transport keys still work while it is open, while editing keys (Delete, Cut, Paste…) don’t.
Using the keyboard
Section titled “Using the keyboard”Tab moves the keyboard focus through the window’s buttons and controls (Shift+Tab goes back), and a blue ring shows where it is. The ring appears only once you press Tab: a click never shows one, and pressing a key command after a click doesn’t either.
Knobs, faders and sliders take the keyboard once they have the focus: the channel strip’s fader, pan knob and send knobs, the track headers’ volume sliders, the master volume, VCA faders and the knobs of the built-in effects.
| Key | Does |
|---|---|
| Up or Right arrow | Raises the value one step (a hundredth of the travel); Shift for a tenth of that |
| Down or Left arrow | Lowers it one step; Shift for a tenth of that |
| Page Up / Page Down | Ten steps up or down |
| Home / End | The lowest or highest value (a fader: -∞ or +6 dB) |
A key change is like a short drag: it writes automation in Touch and Latch, and a run of presses on one control undoes as one step. Key commands with Ctrl, Alt or Cmd still reach the app. Screen readers hear each control’s name and value (“Volume, -6.0 dB”, “Pan, L 12”), and the buttons that show only an icon read their tooltip.
Separate windows
Section titled “Separate windows”The Mixer, the Editors, the Event List, the Channel EQ and the built-in effect panels can each be opened in a window of their own, for example to put the Mixer on a second monitor.
- Open in Separate Window: click the pop-out button at the right end of the panel’s bar (the Mixer’s, the Piano Roll’s or the Audio Track Editor’s), or in an effect panel’s or Channel EQ’s title bar, docked or floating. Window › Mixer in Separate Window and Window › Editor in Separate Window do the same, and the Piano Roll’s and Audio Track Editor’s View menus have the item too.
- Attach to Main Window: the same button in the separate window (pop-in), the same menu items, or the window’s close button. The Mixer and the Editors go back to the bottom section; an effect panel or Channel EQ opens in the main window as Settings › General › Open Effect Panels says (docked or floating).
- One place at a time: while a panel has its own window, it isn’t shown in the main window. X (Mixer), E (Editors), an insert slot or a Channel EQ thumbnail bring its window to the front instead (with Open Effect Panels set to Separate windows, the slot or thumbnail closes it).
- Effect panels in separate windows by default: Settings › General › Open Effect Panels › Separate windows opens every built-in effect panel and Channel EQ in its own window.
- Everything stays live. Meters, the playhead, the selection (the editor follows it), the theme, the interface size, the settings and the clipboards (regions, channel strip settings, plug-ins and Channel EQ: copy in a separate Mixer, paste in the main window) are the same in every window. Key commands and the menu bar work in a separate window as in the main one; the Edit menu acts on the separate window’s editor while it is in front.
- Effect panels opened from a separate Mixer (clicking an insert slot there) float inside the Mixer’s window.
- An effect panel’s or Channel EQ’s own × (or Esc) closes it altogether, and its window goes with it. So does removing the effect or deleting the track.
- Remembered: each kind of window (the Mixer, the Editors, the Channel EQ, each type of effect) reopens where it was last, with its size, on the same monitor if it is still connected (otherwise on the nearest one, moved and shrunk to fit). The Mixer and the Editors reopen in their own windows at the next launch if they were detached when Marbble quit. Separate windows close with the main window.
Marbble is released under the MIT licence.Source on GitHub.